Installing and setting up VoicePilot
VoicePilot allows you to get up and running with dictation in a few minutes, on either macOS or Windows, using the Microsoft Entra ID account your organization already gave you.
We'll take you through the entire setup process, from installing the app to picking the shortcut you'll dictate with.
📋 Prerequisites
- Your organization needs to be licensed for VoicePilot, and an administrator needs to grant consent for it before anyone can sign in.
- If you're not sure whether your tenant is licensed yet, ask your administrator or check the Admin Center.
- On macOS, setup asks for Microphone and Accessibility access. On Windows, it asks for Microphone access only.
⬇️ Installing the App
Download VoicePilot for your platform and open the installer.
- Start the installer and follow the prompts.
- Once it's installed, VoicePilot opens a short setup walkthrough the first time you launch it.

On Windows, VoicePilot lives in the system tray rather than in a main window, and every launch after setup starts there directly.
🔑 Signing In
Setup itself doesn't ask you to sign in; the welcome screen only has a Continue button. Signing in happens on the VoicePilot dashboard, where you click Sign in with Microsoft and authenticate with your Microsoft Entra ID account.
The first person from your organization to sign in also has to approve VoicePilot itself. Microsoft shows the permissions the app is asking for, and an administrator can tick "Consent on behalf of your organization" to approve it for everyone at once.
Depending on your organization's setup, you might see one of the following instead of instant access:
- Consent required - an administrator has to approve VoicePilot for your organization first. If you're an administrator yourself, click Grant consent and make sure to tick "Consent on behalf of your organization" in the Microsoft dialog, since leaving it unticked approves only your own account and the tenant stays locked.
- No license seat available - your access has been requested, and you'll be able to dictate once an administrator approves a license for your account.
- Not licensed - your tenant has no active VoicePilot subscription. Regular users are pointed at their administrator; if you're an administrator, you can click Start trial · Paddle and unlock the tenant without leaving the app.
Each of these screens carries a Check again button, so you can re-test as soon as your administrator has acted. Whichever screen you land on, Sign out in the corner lets you try a different account.
✅ Granting Permissions
Microphone access is the one permission setup asks for on both platforms, and dictation can't record anything without it. Click Grant Access and allow it when your system prompts you.
On macOS, setup adds a second step for Accessibility, which VoicePilot needs to detect your shortcut system-wide and to paste text into other apps.
💡 Screen Recording is not part of setup. macOS only asks for it if you later switch on Context awareness under Settings > Data & Privacy, which lets VoicePilot read relevant text from the app you're dictating into.
⌨️ Choosing Your Shortcuts
Setup walks you through the shortcut steps one at a time. On each, you can click Record shortcut and press the combination you want, pick one of the Presets, or click Disable to turn that shortcut off entirely.
- Hold to Talk - hold the key down while you speak and let go when you're done. Defaults to Right Option on macOS and Right Ctrl on Windows.
- Tap to Toggle - tap once to start recording and tap again to stop. Defaults to Right Option + Command on macOS and Right Ctrl + Alt on Windows.
- Paste Again - optional, and disabled by default. It pastes your last transcript into the active text field again without opening the menu.
On macOS, only Hold to Talk and Paste Again appear as steps. Tap to Toggle ships with its default rather than asking you to decide before you've dictated anything, and you can change it any time under Settings > Shortcuts.
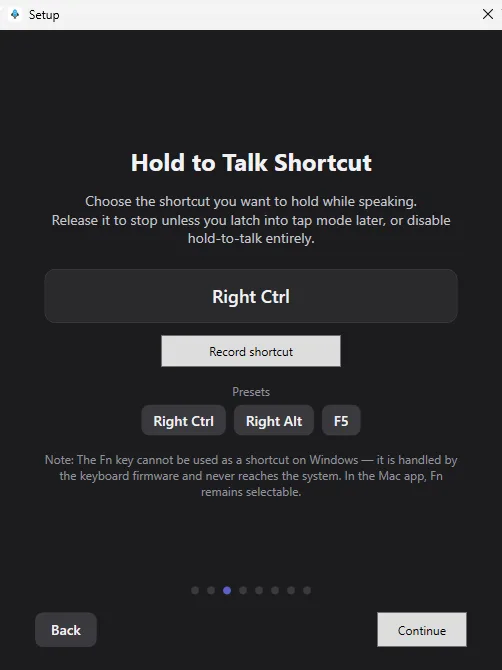
💡 The Fn key can't be used as a shortcut on Windows, since the keyboard firmware handles it and it never reaches the system. In the macOS app, Fn stays selectable.
🏅 Final Results
The last two steps are quick ones. Launch at Login starts VoicePilot automatically when you sign in, and Recording overlay style lets you choose between a Drop-down pill and a smaller, more subtle Compact overlay while you're dictating.
Once you're through them, the closing screen confirms your shortcuts back to you and reminds you that text is pasted at your cursor and copied. You're ready to dictate.
👣 Next Steps
Now that VoicePilot is set up, you can start dictating right away.
We recommend starting here:
⛑️ Need more help?
Get further assistance with VoicePilot through our support chat widget within the app, or reach out to us at support@solutions2share.com